Thank you for Purchasing


Bungalion - Flutter E-Wallet UI Kit

Version 1.0.0


  • Created : 19 Nov 2025
  • Latest Update : 19 Nov 2025

What is Bungalion?


banner

Bungalion a modern, feature-rich, and beautifully crafted UI solution designed to help developers build powerful digital wallet applications with ease. With a modern and user-friendly interface, this template includes all the essential screens needed for a smooth e-wallet experience — from search, filtering, purchasing, and reporting. Built with Flutter, it ensures seamless performance on both Android, iOS devices and even mobile web.

What's Inside?
This template includes a complete set of essential financial features such as purchasing game vouchers, mobile top-ups, and app vouchers, as well as paying for internet, TV, and insurance bills. Every screen is thoughtfully designed to balance clarity and functionality, ensuring users enjoy a smooth and intuitive transaction experience.

Template Feature


  • Flutter. Full source code (Dart)
  • Premium designs. Simple and elegant theme color along with dark and light mode
  • 80+ Screens with 150+ Widgets Ready-to-use UI screens, reusable and easy to customized.
  • Various template screens Wallet, Topup, Product, Voucher, Billing, Payment, Reporting, and many more.
  • Responsive design Support tablet screen
  • Cross-platform support. iOS, Android and Mobile Web
  • Clean architecture & modular design Fully customizable and developer-friendly code structure
  • Fancy 3D icons and illustrations.
  • Documentation. Well documented for customization
  • And many more...

Files and Folder Structure


ewallet_app                          
  ├── README.md
  ├── analysis_options.yaml
  ├── android
  ├── assets
  │   ├── animations
  │   │   └── check.json
  │   ├── fonts
  │   │   ├── Montserrat-Bold.ttf
  │   │   ├── Montserrat-Medium.ttf
  │   │   ├── Montserrat-SemiBold.ttf
  │   │   ├── Oxygen-Bold.ttf
  │   │   ├── Oxygen-Light.ttf
  │   │   └── Oxygen-Regular.ttf
  │   └── images
  │       ├── 1.5x
  │       ├── 2.0x
  │       ├── 3.0x
  │       ├── 4.0x
  ├── devtools_options.yaml
  ├── ios
  ├── lib
  │   ├── app
  │   │   ├── app_link.dart
  │   │   ├── app_routes.dart
  │   │   ├── routes_auth.dart
  │   │   ├── routes_payment.dart
  │   │   ├── routes_product.dart
  │   │   ├── routes_profile.dart
  │   │   ├── routes_ui_collection.dart
  │   │   └── routes_wallet.dart
  │   ├── constants
  │   │   ├── app_const.dart
  │   │   ├── features_const.dart
  │   │   ├── img_api.dart
  │   │   └── img_api_live.dart
  │   ├── controller
  │   │   ├── history_filter_controller.dart
  │   │   ├── input_id_controller.dart
  │   │   ├── package_filter_controller.dart
  │   │   └── product_filter_controller.dart
  │   ├── main.dart
  │   ├── models
  │   │   ├── account_id.dart
  │   │   ├── bank.dart
  │   │   ├── billing.dart
  │   │   ├── cart_item.dart
  │   │   ├── category_report.dart
  │   │   ├── category_type.dart
  │   │   ├── chat.dart
  │   │   ├── company.dart
  │   │   ├── credit.dart
  │   │   ├── faq.dart
  │   │   ├── general_list.dart
  │   │   ├── list_item.dart
  │   │   ├── news.dart
  │   │   ├── notification.dart
  │   │   ├── package.dart
  │   │   ├── product.dart
  │   │   ├── promo.dart
  │   │   ├── purchase_history.dart
  │   │   ├── reward.dart
  │   │   ├── reward_history.dart
  │   │   ├── topup_history.dart
  │   │   ├── transaction.dart
  │   │   ├── transfer_history.dart
  │   │   ├── user.dart
  │   │   ├── vendor.dart
  │   │   └── voucher.dart
  │   ├── screens
  │   │   ├── auth
  │   │   ├── help_support
  │   │   ├── home.dart
  │   │   ├── intro
  │   │   ├── messages
  │   │   ├── not_found.dart
  │   │   ├── payment
  │   │   ├── product
  │   │   ├── profile
  │   │   ├── promo
  │   │   ├── sample_ui
  │   │   ├── search
  │   │   └── wallet
  │   ├── ui
  │   │   ├── layouts
  │   │   └── themes
  │   ├── utils
  │   │   ├── animated_slide_horizontal.dart
  │   │   ├── bottom_draggable_sheet.dart
  │   │   ├── check_platforms.dart
  │   │   ├── col_row.dart
  │   │   ├── color_type.dart
  │   │   ├── confirm_dialog.dart
  │   │   ├── custom_tooltip.dart
  │   │   ├── date_format.dart
  │   │   ├── datepicker_range.dart
  │   │   ├── expanded_section.dart
  │   │   ├── formatter.dart
  │   │   ├── gallery_viewer.dart
  │   │   ├── grabber_icon.dart
  │   │   ├── image_viewer.dart
  │   │   ├── no_data.dart
  │   │   ├── picker.dart
  │   │   ├── placeholder.dart
  │   │   ├── push_screen.dart
  │   │   ├── screen_arguments.dart
  │   │   └── shimmer_preloader.dart
  │   └── widgets
  │       ├── action_header
  │       ├── alert_info
  │       ├── app_button
  │       ├── app_input
  │       ├── auth
  │       ├── bottom_nav
  │       ├── cards
  │       ├── chat
  │       ├── counter
  │       ├── decorations
  │       ├── explore
  │       ├── faq
  │       ├── filters
  │       ├── header
  │       ├── home
  │       ├── notifications
  │       ├── payment
  │       ├── product
  │       ├── profile
  │       ├── promo
  │       ├── review
  │       ├── search
  │       ├── settings
  │       ├── stepper
  │       ├── tab_menu
  │       ├── title
  │       ├── user
  │       └── wallet
  ├── linux
  ├── macos
  ├── pubspec.lock
  ├── pubspec.yaml
  ├── web
  │   ├── favicon.png
  │   ├── icons
  │   │   ├── Icon-192.png
  │   │   ├── Icon-512.png
  │   │   ├── Icon-maskable-192.png
  │   │   └── Icon-maskable-512.png
  │   ├── index.html
  │   ├── loading.gif
  │   └── manifest.json
  └── windows
                          

Environment Setup


Prerequisites


Windows


1. Install Android Studio
  1. Download Android Studio
  2. Run the Installer
    • Run the downloaded installer executable (e.g., android-studio-ide-<version>-windows.exe).
  3. Follow Installation Wizard
    • Follow the instructions in the installation wizard.
    • Choose a custom installation location if needed.
    • Select the components you want to install (Android Studio, Android Virtual Device, etc.).
  4. Start Android Studio
    • Once the installation is complete, launch Android Studio.
  5. Install SDK Components
    • Android Studio will prompt you to install additional SDK components and tools. Allow it to download and install them.
  6. Set up Emulator (Optional)
    • If you plan to use an emulator, you can create one through the AVD (Android Virtual Device) Manager in Android Studio.

2. Install VS Code
  1. Visual Studio Code 1.86 or later with the Flutter extension for VS Code.
  2. Once it is downloaded, run the installer (VSCodeUserSetup-{version}.exe)

    By default, VS Code is installed under C:\Users\{Username}\AppData\Local\Programs\Microsoft VS Code.


3. Install Flutter SDK
  1. Download Flutter SDK
  2. Visit the official Flutter download page for the  latest version for Windows.
  3. Extract Flutter Archive
  4. Extract the downloaded Flutter zip file to a location on your machine. For example, ‘C:\dev’.
  5. Add Flutter to System Path:
    • Add the flutter\bin directory to your system’s PATH variable.
      • Right-click on “This PC” or “Computer” on your desktop or in File Explorer.
      • Select “Properties” -> “Advanced system settings” -> “Environment Variables.”
      • In the “System variables” section, find and select the “Path” variable, then click “Edit.”
      • Click “New” and add the path to the bin directory inside the Flutter directory.
  6. Verify Flutter Installation
    • Open a new Command Prompt and run ‘flutter doctor’ to check for any dependencies that need to be installed or configured.
  7. Launch VS Code. To integrate Flutter with VS Code, please try to create new project

  8. To open the Command Palette, press Control + Shift + P.

  9. In the Command Palette, type flutter.

  10. Select Flutter: New Project.

  11. VS Code prompts you to locate the Flutter SDK on your computer.

    1. If you have the Flutter SDK installed, click Locate SDK.

    2. If you do not have the Flutter SDK installed, click Download SDK.

      This option sends you the Flutter install page if you have not installed Git for Windows as directed in the development tools prerequisites.

      1. VS Code places you in your user profile to start. Choose a different location.

        Consider %USERPROFILE% or C:\dev.

      2. Click Clone Flutter.

        While downloading Flutter, VS Code displays this pop-up notification:

        Downloading the Flutter SDK. This may take a few minutes.

        This download takes a few minutes. If you suspect that the download has hung, click Cancel then start the installation again.

      3. Once it finishes downloading Flutter, the Output panel displays.

        Checking Dart SDK version...
        Downloading Dart SDK from the Flutter engine ...
        Expanding downloaded archive...

        When successful, VS Code displays this pop-up notification:

        Initializing the Flutter SDK. This may take a few minutes.

        While initializing, the Output panel displays the following:

        
                  Building flutter tool...
                  Running pub upgrade...
                  Resolving dependencies...
                  Got dependencies.
                  Downloading Material fonts...
                  Downloading Gradle Wrapper...
                  Downloading package sky_engine...
                  Downloading flutter_patched_sdk tools...
                  Downloading flutter_patched_sdk_product tools...
                  Downloading windows-x64 tools...
                  Downloading windows-x64/font-subset tools...

        This process also runs flutter doctor -v. At this point in the procedure, ignore this output. Flutter Doctor might show errors that don't apply to this quick start.

        When the Flutter install succeeds, VS Code displays this pop-up notification:

        Do you want to add the Flutter SDK to PATH so it's accessible
                                              in external terminals?
      4. Click Add SDK to PATH.

        When successful, a notification displays:

        The Flutter SDK was added to your PATH
      5. VS Code may display a Google Analytics notice.

        If you agree, click OK.

      6. To enable flutter in all PowerShell windows:

        1. Close, then reopen all PowerShell windows.
        2. Restart VS Code.
  12. When prompted Which Flutter template?, ignore it. Press Esc.

  13. Agree to Android licenses. Before you can use Flutter and after you install all prerequisites, agree to the licenses of the Android SDK platform.
    1. Open an elevated console window.

    2. Run the following command to enable signing licenses.

      C:> flutter doctor --android-licenses

      If you accepted the Android Studio licenses at another time, this command returns:

      [========================================] 100% Computing updates...
                                        All SDK package licenses accepted.

      You can skip the next step.

    3. Before agreeing to the terms of each license, read each with care.

Mac OS


1. Install Android Studio
  1. Download Android Studio
  2. Open the DMG file
    • Open the downloaded DMG file.
    • Drag and drop Android Studio into the “Applications” folder.
  3. Run Android Studio
    • Open the “Applications” folder and launch Android Studio.
  4. Set up Android Studio
    • Complete the Android Studio Setup Wizard.
    • Android Studio may prompt you to install additional components and SDKs. Follow the instructions to install them.

2. Install Xcode
  1. Open the App Store and sign in.

  2. Search for Xcode.

  3. Click Install.

    The Xcode installer takes up 6+ GB of storage. The download might take some time.

  4. To configure the command-line tools to use the installed version of Xcode, use the following commands.

    sudo sh -c 'xcode-select -s /Applications/Xcode.app/Contents/Developer && xcodebuild -runFirstLaunch'

    Use this path for the latest version of Xcode. If you need to use a different version, specify that path instead.

  5. Sign the Xcode license agreement.

    sudo xcodebuild -license
3. Install VS Code
  1. Download Visual Studio Code 1.86 or later with the Flutter extension for VS Code.
  2. Open the browser's download list and locate the downloaded app or archive.

  3. If archive, extract the archive contents. Use double-click for some browsers or select the 'magnifying glass' icon with Safari.

  4. Drag Visual Studio Code.app to the Applications folder, making it available in the macOS Launchpad.

  5. Open VS Code from the Applications folder, by double clicking the icon.

  6. Add VS Code to your Dock by right-clicking on the icon, located in the Dock, to bring up the context menu and choosing Options, Keep in Dock.


4. Install Flutter SDK
  1. Download Flutter SDK
  2. Extract Flutter Archive
    • Open a terminal and navigate to the directory where the archive was downloaded.
    • Extract the archive using the following command tar xf flutter_macos_<version>.tar.xz (replace flutter_macos_<version>.tar.xz with the actual filename)
  3. Move to Installation Location
    • Move the extracted folder to a location of your choice. For example : sudo mv flutter /YOUR_DIRECTORY
  4. Add Flutter to System Path
    • Add the flutter/bin directory to your system’s PATH variable.
  5. Verify Flutter Installation
    • Open a new terminal and run: flutter doctor
  6. Launch VS Code. To integrate Flutter with VS Code, please try to create new project

  7. To open the Command Palette, press Control + Shift + P.

  8. In the Command Palette, type flutter.

  9. Select Flutter: New Project.

  10. When the Select Folder for Flutter SDK dialog displays, choose where you want to install Flutter.

    VS Code places you in your user profile to start. Choose a different location.

    Consider ~/development/

  11. Click Clone Flutter.

    While downloading Flutter, VS Code displays this pop-up notification:

    Downloading the Flutter SDK. This may take a few minutes.

    This download takes a few minutes. If you suspect that the download has hung, click Cancel then start the installation again.

  12. Once it finishes downloading Flutter, the Output panel displays.

    Checking Dart SDK version...
    Downloading Dart SDK from the Flutter engine ...
    Expanding downloaded archive...

    When successful, VS Code displays this pop-up notification:

    Initializing the Flutter SDK. This may take a few minutes.

    While initializing, the Output panel displays the following:

    Building flutter tool...
    Running pub upgrade...
    Resolving dependencies...
    Got dependencies.
    Downloading Material fonts...
    Downloading Gradle Wrapper...
    Downloading package sky_engine...
    Downloading flutter_patched_sdk tools...
    Downloading flutter_patched_sdk_product tools...
    Downloading windows-x64 tools...
    Downloading windows-x64/font-subset tools...

    This process also runs flutter doctor -v. At this point in the procedure, ignore this output. Flutter Doctor might show errors that don't apply to this quick start.

    When the Flutter install succeeds, VS Code displays this pop-up notification:

    Do you want to add the Flutter SDK to PATH so it's accessible
                                    in external terminals?
  13. VS Code may display a Google Analytics notice.

    If you agree, click OK.

  14. To enable flutter in all Terminal windows:

    1. Close, then reopen all Terminal windows.
    2. Restart VS Code.
  15. Install CocoaPods. If your apps depend on Flutter plugins with native iOS code, install CocoaPods. This program bundles various dependencies across Flutter and iOS code.
  16. Install cocoapods following the CocoaPods install guide.

    sudo gem install cocoapods
  17. Launch your preferred text editor.

  18. Open the Zsh environmental variable file ~/.zshenv in your text editor.

  19. Copy the following line and paste it at the end of your ~/.zshenv file.

    bash
    export PATH=$HOME/.gem/bin:$PATH
  20. Save your ~/.zshenv file.

  21. To apply this change, restart all open terminal sessions.

Linux


1. Install Android Studio
  • Download Android Studio
  • Extract the Archive
    • Open a terminal and navigate to the directory where the archive was downloaded.
    • Extract the archive using the following command tar -xvzf android-studio-ide-<version>-linux.tar.gz (replace android-studio-ide-<version>-linux.tar.gz with the actual filename)
  • Move to Installation Location
    • Move the extracted folder to a location of your choice. For example: sudo mv android-studio /YOUR_DIRECTORY
  • Run Android Studio Setup
    • Navigate to the bin directory inside the Android Studio folder: cd /YOUR_DIRECTORY/android-studio/bin
    • Run ‘./studio.sh’ to start the Android Studio setup
  • Follow Installation Wizard
    • Follow the instructions in the setup wizard to complete the installation.
    • Choose a custom installation location if needed.

2. Install VS Code
  1. The easiest way to install Visual Studio Code for Debian/Ubuntu based distributions is to download and install the .deb package (64-bit), either through the graphical software center if it's available, or through the command line with:

    sudo apt install ./<file>.deb
                                  
    # If you're on an older Linux distribution, you will need to run this instead:
    # sudo dpkg -i <file>.deb
    # sudo apt-get install -f # Install dependencies
    
    Note

    Other binaries are also available on the VS Code download page.

    When you install the .deb package, it prompts to install the apt repository and signing key to enable auto-updating using the system's package manager.

  2. To automatically install the apt repository and signing key, such as on a non-interactive terminal, run the following command first:

    echo "code code/add-microsoft-repo boolean true" | sudo debconf-set-selections
                                  
  3. To manually install the apt repository:

    1. Run the following script:

      sudo apt-get install wget gpg
      wget -qO- https://packages.microsoft.com/keys/microsoft.asc | gpg --dearmor > packages.microsoft.gpg
      sudo install -D -o root -g root -m 644 packages.microsoft.gpg /etc/apt/keyrings/packages.microsoft.gpg
      echo "deb [arch=amd64,arm64,armhf signed-by=/etc/apt/keyrings/packages.microsoft.gpg] https://packages.microsoft.com/repos/code stable main" |sudo tee /etc/apt/sources.list.d/vscode.list > /dev/null
      rm -f packages.microsoft.gpg
                                    
    2. Then update the package cache and install the package using:

      sudo apt install apt-transport-https
      sudo apt update
      sudo apt install code # or code-insiders
      

3. Install Flutter SDK
  • Download Flutter SDK
  • Extract Flutter Archive
    • Open a terminal and navigate to the directory where the archive was downloaded.
    • Extract the archive using the following command tar xf flutter_linux_<version>.tar.xz (replace flutter_linux_<version>.tar.xz with the actual filename)
  • Move to Installation Location
    • Move the extracted folder to a location of your choice. For example: sudo mv flutter /YOUR_DIRECTORY
  • Add Flutter to System Path
    • Add the flutter/bin directory to your system’s PATH variable.
  • Verify Flutter Installation
    • Open a new terminal and run: flutter doctor
  • Launch VS Code. To integrate Flutter with VS Code, please try to create new project

  • To open the Command Palette, press Control + Shift + P.

  • In the Command Palette, type flutter.

  • Select Flutter: New Project.

  • VS Code prompts you to locate the Flutter SDK on your computer.

    1. If you have the Flutter SDK installed, click Locate SDK.

    2. If you do not have the Flutter SDK installed, click Download SDK.

      This option sends you the Flutter install page if you have not installed Git as directed in the development tools prerequisites.

      1. When the Select Folder for Flutter SDK dialog displays, choose where you want to install Flutter.

        VS Code places you in your user profile to start. Choose a different location.

        Consider ~/development/

      2. Click Clone Flutter.

        While downloading Flutter, VS Code displays this pop-up notification:

        Downloading the Flutter SDK. This may take a few minutes.

        This download takes a few minutes. If you suspect that the download has hung, click Cancel then start the installation again.

      3. Once it finishes downloading Flutter, the Output panel displays.

        Checking Dart SDK version...
        Downloading Dart SDK from the Flutter engine ...
        Expanding downloaded archive...

        When successful, VS Code displays this pop-up notification:

        Initializing the Flutter SDK. This may take a few minutes.

        While initializing, the Output panel displays the following:

        Building flutter tool...
        Running pub upgrade...
        Resolving dependencies...
        Got dependencies.
        Downloading Material fonts...
        Downloading Gradle Wrapper...
        Downloading package sky_engine...
        Downloading flutter_patched_sdk tools...
        Downloading flutter_patched_sdk_product tools...
        Downloading windows-x64 tools...
        Downloading windows-x64/font-subset tools...

        This process also runs flutter doctor -v. At this point in the procedure, ignore this output. Flutter Doctor might show errors that don't apply to this quick start.

        When the Flutter install succeeds, VS Code displays this pop-up notification:

        Do you want to add the Flutter SDK to PATH so it's accessible
                                              in external terminals?
      4. VS Code may display a Google Analytics notice.

        If you agree, click OK.

      5. To enable flutter in all Terminal windows:

        1. Close, then reopen all Terminal windows.
        2. Restart VS Code.
  • When prompted Which Flutter template?, ignore it. Press Esc. You can create a test project after checking your development setup.

  • Agree to Android licenses. Before you can use Flutter and after you install all prerequisites, agree to the licenses of the Android SDK platform.
    1. Open an elevated console window.

    2. Run the following command to enable signing licenses.

      flutter doctor --android-licenses

      If you accepted the Android Studio licenses at another time, this command returns:

      [========================================] 100% Computing updates...
                                        All SDK package licenses accepted.

      You can skip the next step.

    3. Before agreeing to the terms of each license, read each with care.

Installation and Running App


Install Dependencies


Bungalion is built on Flutter. To begin, it’s essential to verify that your Flutter and Integrated Development Environment (IDE) setup has been configured accurately
  • Connect to the internet
  • Execute the command flutter doctor in your terminal. If any issues arise during this process, make sure to address and resolve them promptly.
  • Then open your project. Once the project is open, VS Code may prompt you to install the dependencies. Click Install Dependencies
  • If not, you can run the flutter pub get from the terminal in the project directory to fetch the dependencies.
  • And for the another way, you can open pubspec.yaml
  • Click icon on top right corner
  • Wait until dependencies installation finish
  • After the dependencies are installed, you should be able to run the app.

Run and Debug App

  • Using VS Code's built-in debugging features, such as setting breakpoints.
  • Open lib/main.dart
  • Click menu Run > Start Debuging (F5)
    run
  • Selecting a target device. When a Flutter project is open in VS Code, you should see a set of Flutter specific entries in the status bar, including a Flutter SDK version and a device name (or the message No Devices)
    device

Build & Deployment


Build Android

  1. Open Terminal Console
  2. Run the following command to build the APK
    flutter build apk
  3. Wait until finish. And the APK built result will be placed in build/app/outputs/flutter-apk/app-release.apk
  4. This command will compile your Flutter code and generate the APK file. You can find the APK in the build/app/outputs/flutter-apk directory inside your project folder. The APK file will be named something like app-release.apk or app-debug.apk.
  5. By using the above command, you will get a larger merged apk with this. But you can split them with this command
    flutter build apk --target-platform android-arm,android-arm64,android-x64 --split-per-abi
  6. With this command, Flutter will generate three APKs, use one of them which is compatible with your device.
  7. When you're ready to prepare a release version of your app, for example to publish to the Google Play Store, this page can help. Before publishing, you might want to put some finishing touches on your app. This guide explains how to perform the following tasks:
  8. For more deploying documentations please follow this documentation: https://docs.flutter.dev/deployment/android       
build

Build iOS

  1. Open Explorer File in VS Code. Right click on the ios folder
    ios
  2. It will open Xcode. On Left Sidebar click Runner. And then choose tab Signing & Capabilities > All
  3. Expand Signing, then Select Team
    xcode
  4. Open terminal and locate to your project.
  5. Run the following command to build the Runner.app
    flutter build ios
  6. Wait until finish. And the Runner.app built result will be placed in build/ios/iphoneos/Runner.app
    runner
  7. There is no general way to generate apps for iOS. Apple doesn’t allow you to install apps like this. If you want to install it on your iOS device, then you have to deploy it on TestFlight or AppStore. For deploying it, please follow this documentation: https://docs.flutter.dev/deployment/ios 


Build and Deploy Web

  1. Open terminal and locate to your project.
  2. Run the following command to build the web app:
    flutter build web
  3. Wait until finish. And the APK built result will be placed in build/web web
  4. To deploy it, copy all files inside web/ folder to your web server or cloud hosting
  5. When you are ready to deploy your app, upload the buld web release to Vercel or a similar service. Here are a few possibilities, but there are many others:
  6. Example with Vercel. Open terminal and locate your project, go to build/web, and run this command:
    vercel deploy --prod
  7. Follow the instruction and wait until deployment finish.
    vercel
  8. Open production link in browser

Troublehooting


Here's most common error problem when build and debug the project

  • The NDK version 29.0.13113456 can be install manually by going into android studio -> SDK manager -> SDK tools. Select the show package detail checkbox.
  • You will be able to see all the NDK versions available.
  • More details: https://developer.android.com/studio/projects/install-ndk#specific-version
studio
  • This issue sometimes appear when build Android App or Debuging in Android Device or Emulator.
  • Open Explorer File in VS Code. Right click on the android folder
    studio
  • In Android studio will show notification on the right bottom to upgrade AGP
    studio
  • Click Start AGP Upgrade Assistant
  • It will download and install Graddle library and take sometime. Wait until finish.
  • Run build or debug again
  • Fixed by updating flutter and cocoa pods to the latest version.
  •                                       
    flutter clean
    rm -Rf ios/Pods
    rm -Rf ios/.symlinks
    rm -Rf ios/Flutter/Flutter.framework
    rm -Rf ios/Flutter/Flutter.podspec
    flutter pub get
    cd ios
    pod install # (or on an M1+ mac: arch -x86_64 pod install)
    cd ..
    flutter build ios
    flutter run
                                          
                                        
  • Accept the latest apple developer agreement by logging with Account Holder credentials in to https://developer.apple.com
  • Open ios/ folder in Xcode. On Left Sidebar click Runner. And then choose tab Signing & Capabilities > All Expand Signing, then Select Team
  • it will auto generate all certificates. But note that they all are created virtually, so cannot see anywhere in your account or keychain, then also you are able to run or install application in your device.
  • Try run buid or debug the project again


Basic Code Structure


Main

/lib/main.dart We know that any programming language has the main entry point. This means that this is where our program first gets programmatically executed. So in dart we also have this, main () function.

code   code

This template uses GetX, so we added "Get" before your MaterialApp, turning it into GetMaterialApp. This does not modify the MaterialApp of the Flutter, GetMaterialApp is not a modified MaterialApp, it is just a pre-configured Widget, which has the default MaterialApp as a child. GetMaterialApp is necessary for routes, snackbars, internationalization, bottomSheets, dialogs, and high-level apis related to routes and absence of context. See more references about GetX

Change App Logo and Name


To change App logo and App Icon you need to follow these steps :

App Logo
  • Go to <project>/assets/images/ and replace app_logo.png with your own logo.
  • Recomended size is 1024x1024 pixels


App Icon

You can generate your app icon using this site appicon.co

  • For Android go to /android/app/src/main/res and replace all mipmap folders with your <generated icon>/android folder.
  • For iOS go to /ios/Runner/Assets.xcassets and replace AppIcon.appiconset with your generated Assets.xcassets folder.


App Name

You need to set your app name in three different places.

  • Go to <project>/lib/constants/app_const.dart and set the value of branding.name
    // Project
    Company branding = Company(
      id: '1',
      name: 'Ewallet App',
      // rest code
    );
  • Change the value of label from <project>/android/app/src/main/AndroidManifest.xml
    android:label="YOUR_APP_NAME"
  • Change the value of CFBundleName from <project>/iOS/Runner/info.plist
    
    <key>CFBundleDisplayName</key>
    <string>Your App Name</string>
    <key>CFBundleName</key>
    <string>your_app_name</string>                         


Change App Package
  1. First, you have to find out the existing package name.
  2. You can find it out from the top of the android/app/src/main/AndroidManifest.xml file.
  3. Now right-click on the project folder and click on replace in the path. You will get a popup window with two input boxes. In the first box, you have to put the existing package name that you saw in the AndroidManifest.xml file previously and write down your preferred package name in the second box
  4. And then click on the Replace All button.

Create Widgets and Screen


Create new widget

  1. Open VS Code and create new dart file in lib/widgets. For example my_widget.dart
  2. Open the file, then start type stl then pres crtl or control + space. Then the autocomplete options will show and choose Flutter Stateless Widget or Flutter Stateful Widget
    stl
    Here's the references for Flutter Widget type: https://docs.flutter.dev/ui/interactivity#stateful-and-stateless-widgets
  3. In this documentation, lets choose Flutter Stateless Widget. And will autometically generated this code
                            
    // lib/widgets/my_widget.dart
    
    import 'package:flutter/material.dart';
    
    class MyWidget extends StatelessWidget {
      const MyWidget({super.key});
    
      @override
      Widget build(BuildContext context) {
        return const Placeholder();
      }
    }
                            
                          
  4. Start build your widget inside Widget build
                            
    // lib/widgets/my_widget.dart
    
    import 'package:flutter/material.dart';
    
    class MyWidget extends StatelessWidget {
      const MyWidget({super.key});
    
      @override
      Widget build(BuildContext context) {
        return Container(
          padding: const EdgeInsets.all(16.0),
          color: Colors.blue,
          child: const Text(
            'Hello, World!',
            style: TextStyle(color: Colors.white, fontSize: 18),
          ),
        );
      }
    }


Create new screen

  1. Basically screen is widget. The screen contain some related widgets and it's registered to the application routing.
  2. Open VS Code and create new dart file in lib/screens. For example my_screen.dart
  3. Open the file, then start type stl then pres crtl or control + space. Then the autocomplete options will show and choose Flutter Stateless Widget or Flutter Stateful Widget
    stl
    Here's the references for Flutter Widget type: https://docs.flutter.dev/ui/interactivity#stateful-and-stateless-widgets
  4. Choose Flutter Stateless Widget. And use Scaffold widget to enable the basic screen layout like AppBar, BottomNav, Back Nav, Action Button, Drawer, etc. Don't forget to add MyWidget that we created before to this screen
                            
    // lib/screens/my_screen.dart
    
    import 'package:flutter/material.dart';
    import 'package:ewallet_app/widgets/my_widget.dart';
    
    class MyScreen extends StatelessWidget {
      const MyScreen({super.key});
    
      @override
      Widget build(BuildContext context) {
        return Scaffold(
          appBar: AppBar(
            title: const Text('My Widget'),
          ),
          body: const MyWidget()
        );
    }                        
                            
                          
  5. Registering screen to app router. Open lib/app/app_routes.dart. Then add new routing to MyScreen with '/myscreen' path
                            
    import 'package:ewallet_app/screens/my_screen.dart';
    
    final List<GetPage> appRoutes = [
      GetPage(
        name: '/myscreen',
        page: () => GeneralLayout(content: MyScreen()),
      ),
      // rest code
    ]
                            
                          
    You can also put the string path to lib/app/app_link
  6. Now you can navigate to the MyScreen from anywhere. Example for navigation to the MyScreen when button onPress/onTap
                            
    FilledButton(
      onPressed: () {
        Get.toNamed('/myscreen');
        // You can also use AppLink if you already registered the route path to lib/app/app_link.dart
        // Get.toNamed(AppLink.myScreen);
      },
      child: Text('Go to My Screen'),
    )


Theme and Layout


Theme Data

/lib/ui/themes/theme_data.dart

Theme Data class defines the configuration of the overall visual Theme for a MaterialApp or a widget subtree within the app. The MaterialApp theme property can be used to configure the appearance of the entire app. Widget subtrees within an app can override the app's theme by including a Theme widget at the top of the subtree.

Theme Data can handle dynamic color base on Dark on Light Mode Device. All Theme Data values, can be accessed from /lib/ui/themes/theme_palette.dart with colorScheme(context)


import 'package:ewallet_app/ui/themes/theme_palette.dart';

Container(
  height: 100,
  padding: EdgeInsets.all(spacingUnit(2)),
  decoration: BoxDecoration(
    color: colorScheme(context).primaryContainer,
  ),
  child: const Text('Lorem ipsum dolor')
),
                    

The background color will adapt to the device light/dark mode. The primary color will be lighten on light mode and darken when dark mode
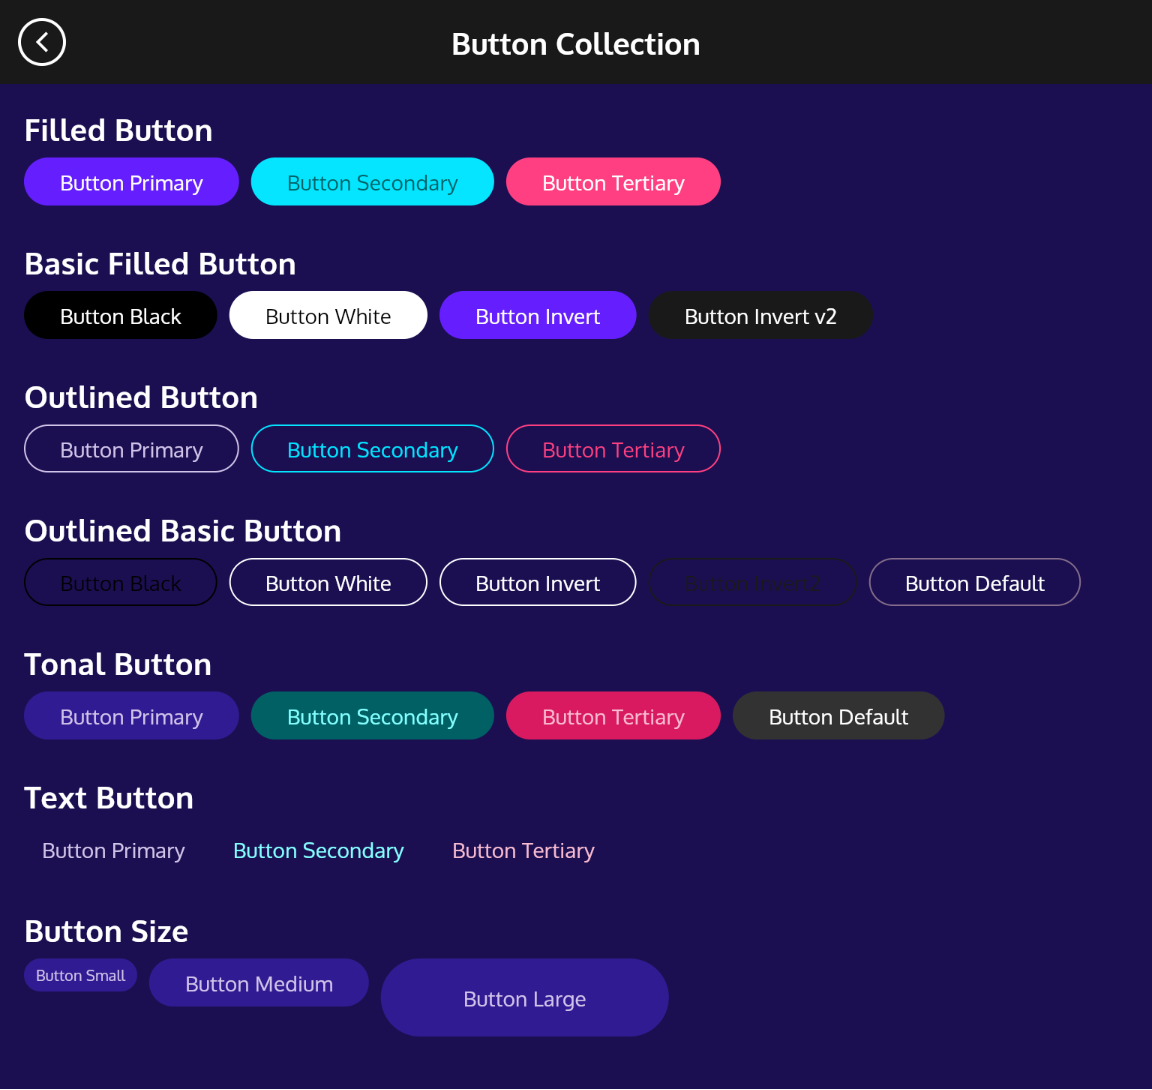


Theme Button

/lib/ui/themes/theme_button.dart

This is a global styling for variant buttons style including sizes and colors


import 'package:ewallet_app/ui/themes/theme_button.dart';

FilledButton(
  onPressed: () {},
  style: ThemeButton.btnBig.merge(ThemeButton.primary),
  child: const Text('SAVE', style: ThemeText.subtitle2)
),
                  

button


Theme Spacing

/lib/ui/themes/theme_spacing.dart
  • Spacing unit uses for padding, margin, and other spacing to make ui consistent. The spacing unit base on 8px, that mean if you use spacingUnit(3) it's equal 24px

    
        import 'package:ewallet_app/ui/themes/theme_spacing.dart';
    
        Container(
          height: 100,
          padding: EdgeInsets.all(spacingUnit(3)),
          child: const Text('Lorem ipsum dolor')
        ),                    
                          
  • Vertical Spacing is a Blank Space Widget uses for vertical separator between section.
    • VSpaceShort(): 16px
    • VSpace(): 24px
    • VSpaceBig(): 48px
    
    import 'package:ewallet_app/ui/themes/theme_spacing.dart';
    
    Column(
      children: [
        const MyWidget(),
        const VSpace(),
        const OtherWidget(),
      ]
    );


Theme Breakpoints

/lib/ui/themes/theme_breakpoints.dart

Theme Breakpoints is helper class to check screen size and layout constraint

  • ThemeSize: This class has static values that defined every common screen sizes
    
    class ThemeSize {
      static double xs = 480;
      static double sm = 600;
      static double md = 768;
      static double lg = 960;
      static double xl = 1280;
      static double xxl = 1536;
    }                      
                          

    Example usage:

    
    import 'package:ewallet_app/ui/themes/theme_breakpoints.dart';
    
    ConstrainedBox(
      constraints: BoxConstraints(
        maxWidth: ThemeSize.sm 
      ),         
    )
                          
  • ThemeBreakpoints: This class is used to check screen size. It has 2 type, up to check minimum size of screen and down to check maximum size of screen. In this template mostly using up for Mobile First Responsive.
    
    import 'package:ewallet_app/ui/themes/theme_breakpoints.dart'; 
    
    Container(
      height: ThemeBreakpoints.mdUp(context) ? 280 : 320, 
    )
                          
  • ThemeConstraint: This class similiar like ThemeBreakpoints, but it has constraint parameter. You can use it with LayoutBuilder to get and set the constraint value.
    
    import 'package:ewallet_app/ui/themes/theme_breakpoints.dart'; 
    
    LayoutBuilder(
      builder: (context, constraints) {
        return Container(
          height: ThemeConstraint.mdUp(constraints) ? 280 : 320, 
        )
      }
    );


Theme Radius and Shadow

/lib/ui/themes/theme_radius.dart and /lib/ui/themes/theme_shadow.dart
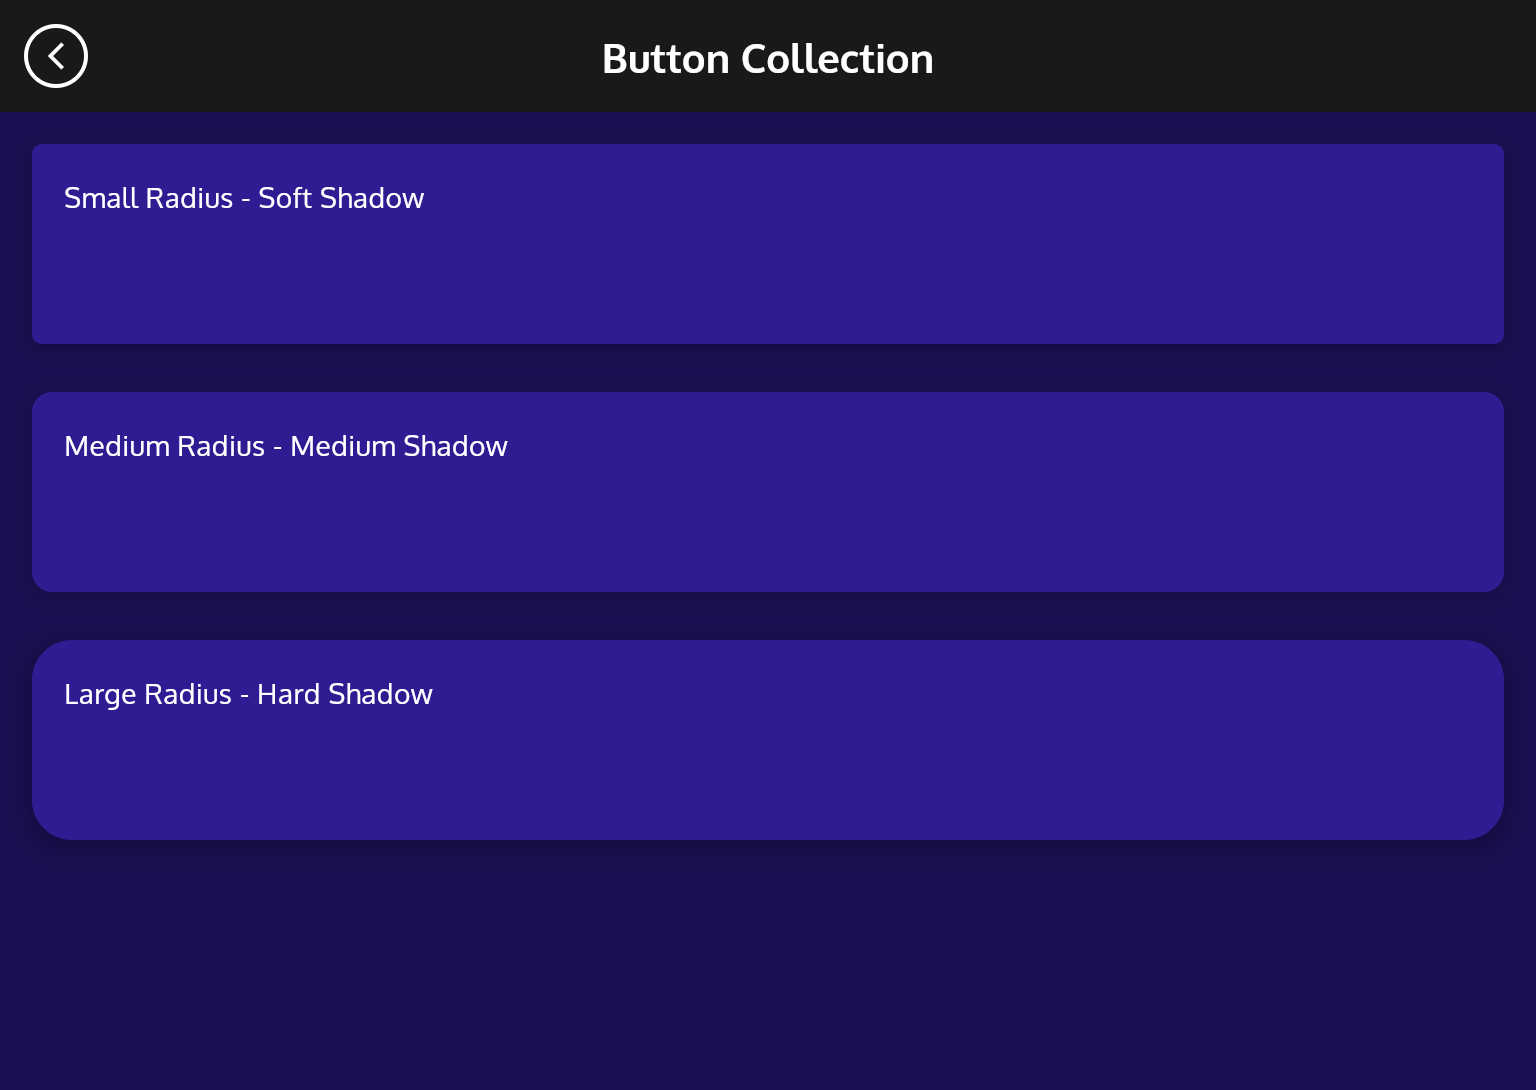
shade
  • Theme Radius is a BorderRadiusGeomentry using BorderRadius.circular which has same radius value on each corner
    
    import 'package:ewallet_app/ui/themes/theme_radius.dart';
    
    Container(
      decoration: BoxDecoration(
        borderRadius: ThemeRadius.small,
        color: Colors.amber,
      ),
    )
                          
  • Theme Shadow is the global style for shadow shadeSoft, shadeMedium, and shadeHard
    
    import 'package:ewallet_app/ui/themes/theme_shadow.dart';                      
    
    Container(
      width: 180,
      decoration: BoxDecoration(
        color: colorScheme(context).surface,
        borderRadius: ThemeRadius.medium,
        boxShadow: [ThemeShade.shadeSoft(context)],
      ),
    )


Layout

This template has 7 layouts Home Layout and General Layout

  • Home Layout has Bottom Menu for main app navigation.
    layout
    
        import 'package:ewallet_app/ui/layouts/home_layout.dart';
    
        GetPage(
          name: AppLink.myTicket,
          page: () => const HomeLayout(content: OrderList()),
          transition: Transition.fadeIn,
          transitionDuration: const Duration(milliseconds: pageTransitionDuration)
        ),                      
                              
  • General Layout doesn't have any additional widget, just blank layout with constraint maxWidth: 1024 and minHeight: 480
    layout
    
    import 'package:ewallet_app/ui/layouts/general_layout.dart';
    
    GetPage(
      name: AppLink.formSample,
      page: () => const GeneralLayout(content: FormInputCollection()),
    ),                   
                          
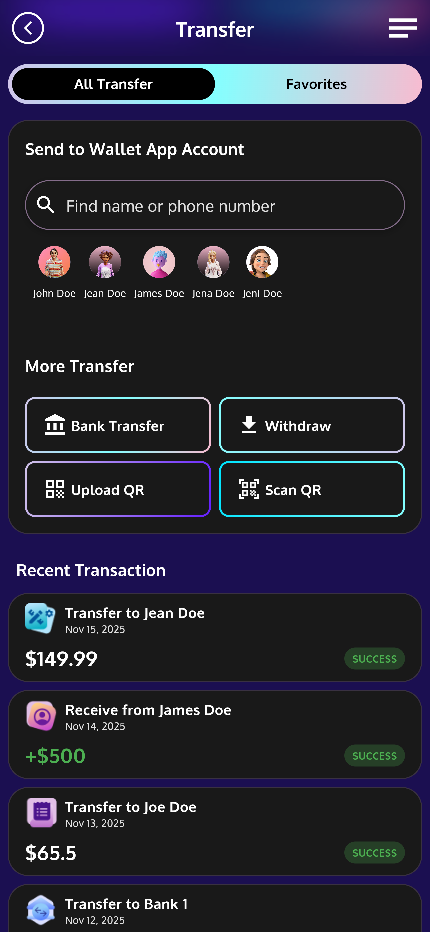
  • Default Layout used by mostly screen. It has AppBar with decoration and back button, and also required title
    layout
    
    import 'package:ewallet_app/ui/layouts/default_layout.dart';
    
    GetPage(
      name: AppLink.transfer,
      page: () => DefaultLayout(
        title: 'Transfer',
        content: TransferScreen(),
        actions: [HistoryBtn(
          onPressed: () {
            Get.toNamed(AppLink.history);
          }
        )]
      ),
    ),        
                          
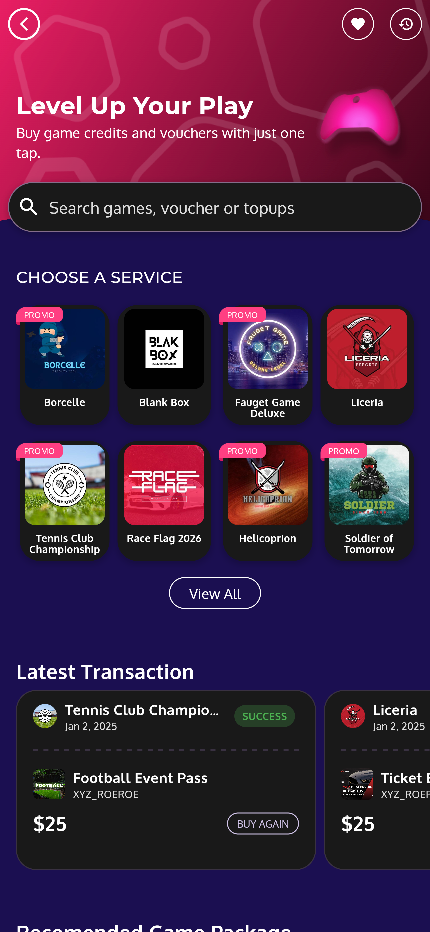
  • Product Layout used by product list screen to choose product item before make a purchase. It has banner-cover style with SliverPersistentHeader and containing short description with an icon.
    layout
    
    import 'package:ewallet_app/ui/layouts/product_layout.dart';
    
    ProductLayout(
      title: 'Education',
      headline: 'Invest in Learning',
      searchTitle: 'Search streamings and entertainments',
      desc: 'Pay tuition, courses, and e-learning easily from your e-wallet.',
      icon: ImgApi.icon3Education,
      background: ImgApi.educationBg,
      color: getCategory('education').color,
      children: <Widget>[
        /// ...Item Widgets
      ]
    ); 
                          
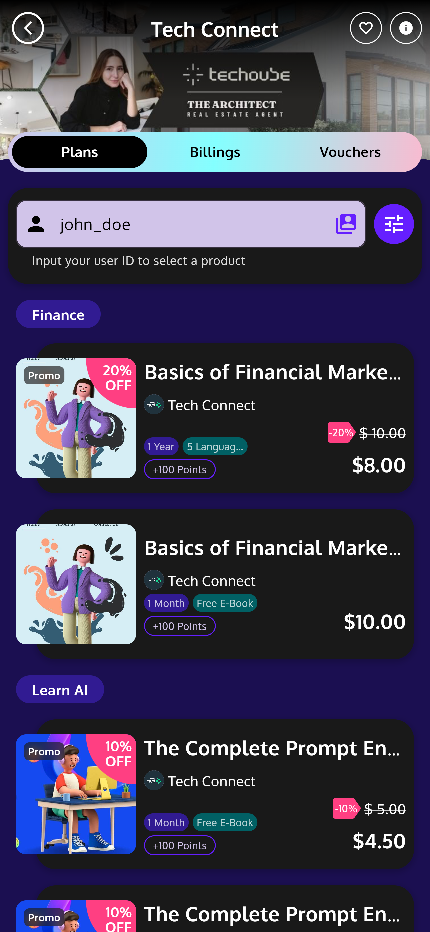
  • Purchase Layout It used by purchase product screen. It has cover and title base on vendor attributes and tab custom categories. The tab menus are depend on vendor provided products like packages, voucher, or billing.
    layout
    
    import 'package:ewallet_app/ui/layouts/purchase_layout.dart';
    
    PurchaseLayout(
      scaffoldKey: _scaffoldKey,
      name: vendor.name,
      image: vendor.banner ?? ImgApi.photo[102],
      menus: <String>['Plans', 'Billings', 'Vouchers'],
      tabController: _tabController,
      children: <Widget>[
        /// ... Widget
    
        Expanded(
          child: TabBarView(
            controller: _tabController,
            children: <Widget>[
              /// ...Tab Items
            ],
          )
        ),
      ]
    );
                          
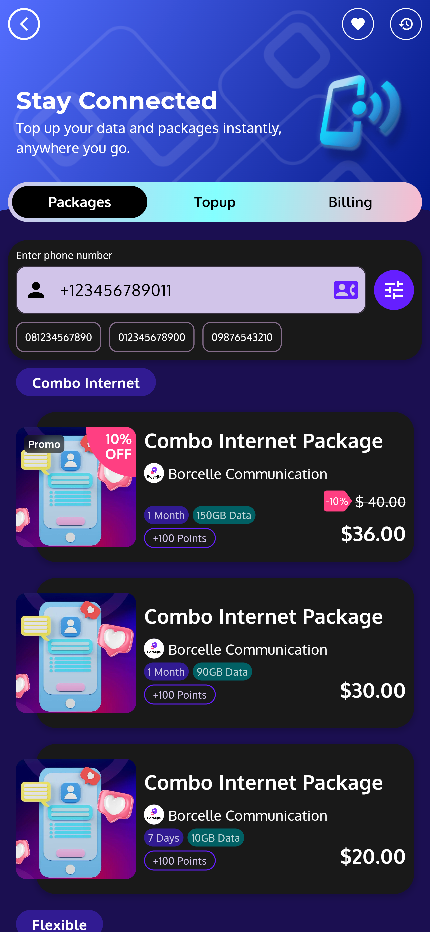
  • Purchase Cover Layout It used by purchase product screen. It has banner-cover style with SliverPersistentHeader and containing short description with an icon. The tab menus are depend on vendor provided products like packages, voucher, or billing.
    layout
    
    import 'package:ewallet_app/ui/layouts/purchase_cover_layout.dart';
    
    PurchaseCoverLayout(
      scaffoldKey: _scaffoldKey,
      name: 'Mobile',
      headline: 'Stay Connected',
      desc: 'Top up your data and packages instantly, anywhere you go.',
      icon: ImgApi.icon3dMobile,
      background: ImgApi.mobileBg,
      color: getCategory('mobile').color,
      menus: <String>['Packages', 'Topup', 'Billing'],
      tabController: _tabController,
      scrollController: _scrollLayout,
      extendBottom: Container(
        /// INPUT ID
        padding: EdgeInsets.symmetric(horizontal: spacingUnit(1)),
        child: InputIdNumber(
          /// ...Extended Widget Attributes
        ),
      ),
      children: <Widget>[
        /// CONTENT
        Expanded(
          child: TabBarView(
            controller: _tabController,
            children: <Widget>[
              /// ...Tab Items
            ],
          ),
        ),
      ],
    );
                          
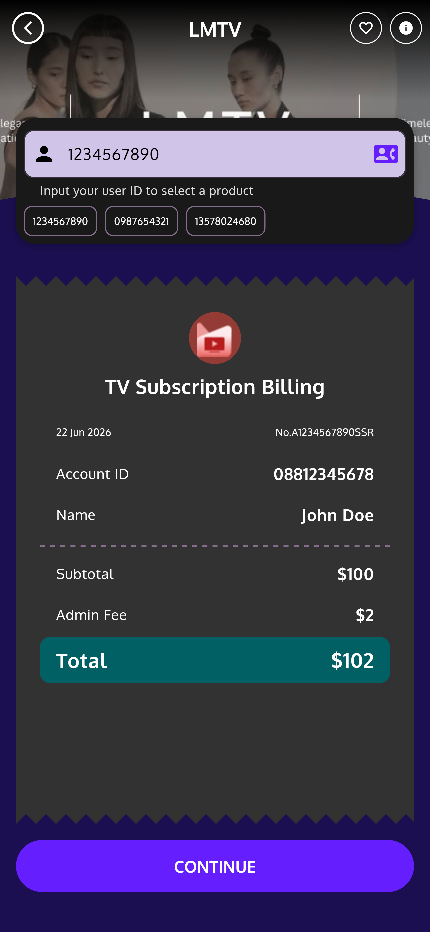
  • Billing Layout It used by billing product screen. It has cover and title base on vendor attributes and input id number.
    layout
    
    import 'package:ewallet_app/ui/layouts/billing_layout.dart';
    
    BillingLayout(
      name: vendor.name,
      image: vendor.banner ?? ImgApi.photo[102],
      child: Obx(() => _inputController.isValidInput.value ? BillingDetail(
        name: 'TV Subscription Billing',
        icon: CircleAvatar(
          radius: 26,
          backgroundColor: getCategory('tv').color.withValues(alpha: 0.5),
          child: Image.asset(getCategory('tv').image, width: 36,),
        )
      ) : NoData(
        image: ImgApi.promoTv,
        title: 'Pay TV Billing',
        desc: 'Type ID number to check your TV subscription billing',
      ))
    );
                          

Icons and Illustrations


3D Illustrations

The 3D illustration assets made with Adobe Photoshop. To edit it, you need Adobe Photoshop CC and Install the Icon Font to your system.

  1. To install the Icon Font please download the font here https://cdn.jsdelivr.net/npm/@mdi/font@7.4.47/fonts/materialdesignicons-webfont.ttf
  2. Windows: Double click the font file, and it will open the file then click install
    font
  3. Mac: Open Font Book app, Drag the font file and drop it directly into the Font Book window. A dialog will appear asking to confirm the installation. Click Install
    font

After you install the Icon Font, you can continue to edit the illustration in Adobe Photoshop.

  1. Open a PSD file assets/illustrations/**/*.psd
    psd
  2. To change the illustration please double click a smart object in layer panel.
    psd
  3. Then it will open a new tab (.PSB file), the image actually a character that you can be selected with Text Tool
    psd
  4. To explore all available icon please open https://pictogrammers.com/library/mdi/. Choose any icon you want, and copy the icon font to Photoshop
    psd
  5. Click Copy Glyph to copy the icon.
    psd
  6. Back to Photoshop, double click a smart object in layer panel. It will open a new tab (.PSB file). Select the icon with Text Tool and paste the character.
    Save it and you may close the PSB file. Go back to main file, the illustration should be changed including other layer effects like shadow, emboss, gradient, etc.
  7. You can export it with different size. Right click to the layer, then choose Export As...
    psd
  8. Add some variant sizes 1x, 1.5x, 2x, 3x, 4x. Click export and choose destination to assets/images. Please move the location and change file name by according each folder: 1.5x, 2.0x, 3.0x, 4.0x.
    psd
  9. To see the result, plase restart the Apps for any assets changes.


Icons

This template also including Icons with gradient style made with figma. To edit the icon please import the Figma file assets/icons/Bungalion Icons and Backgrounds.fig to your figma account.

  1. The icon uses Material Design Icons Plugin https://www.figma.com/community/plugin/740272380439725040
  2. Or you can search Material Design Icons in Manage plugin... from figma menu.
    figma
  3. The icon base is vector, so you can edit or modify just like another graphic vector.
  4. To export it you can select the layer or layeers icons, then in Export options add some size variant 1x, 1.5x, 2x, 3x, 4x. Click export and choose destination to assets/images/icons/gradient/. Please move the location and change file name by according each folder: 1.5x, 2.0x, 3.0x, 4.0x.
  5. To see the result, plase restart the Apps for any assets changes.

Font and Color


Font

/lib/ui/themes/theme_text.dart

Theme text is used for Typography styling


import 'package:ewallet_app/ui/themes/theme_text.dart';

Column(children: {
  Text('Title', style: style: ThemeText.title),
  Text('Title2', style: style: ThemeText.title2),
  Text('Subtitle', style: style: ThemeText.subtitle),
  Text('Subtitl2', style: style: ThemeText.subtitle2),
  Text('Paragraph', style: style: ThemeText.paragraph),
  Text('Paragraph Bold', style: style: ThemeText.paragraphBold),
  Text('Caption', style: style: ThemeText.caption),
})
                    
font

Color

/lib/ui/themes/theme_palette.dart

ThemePalette object is a color palette collection: primary, secondary, tertiary.


import 'package:ewallet_app/ui/themes/theme_palette.dart';

Container(
  height: 100,
  padding: EdgeInsets.all(spacingUnit(2)),
  decoration: BoxDecoration(
    color: ThemePalette.primaryMain,
  ),
  child: const Text('Lorem ipsum dolor')
),
                    

color

Install Dependencies

You can get flutter dependencies from https://pub.dev/


  • Find dependencies you want from https://pub.dev/ or from VS Code
  • In VS Code, click search on the top, and type ">"
  • Some option will show, choose Dart: Add Dependency
  • Type package name, then press Enter. It will download the dependecy and listed in the pubspec.yaml
pub

The another way, you can copy and paste the dependency name with spesific version to pubspec.yaml, then save and it will automatically download the dependency. If not you can run flutter pub dev

External Reference

Here's some external reference of library that we used


Sources and Credit


Fonts :
  • Oxygen
  • Montserrat
Preview Images Used
Note: All images are just used for Preview Purpose Only. They are not part of the template and NOT included in the final purchase files.


Credits
Name Package Repository License
carousel_slider https://pub.dev/packages/carousel_slider MIT
change_case https://pub.dev/packages/change_case MIT
cupertino_icons https://pub.dev/packages/cupertino_icons MIT
fl_chart https://pub.dev/packages/fl_chart MIT
flutter https://github.com/flutter/flutter BSD-3-Clause license
flutter_form_builder https://pub.dev/packages/flutter_form_builder MIT
flutter_markdown https://pub.dev/packages/flutter_markdown BSD-3-Clause
flutter_sticky_header https://pub.dev/packages/flutter_sticky_header MIT
flutter_timer_countdown: ^1.0.7 https://pub.dev/packages/flutter_timer_countdown MIT
font_awesome_flutter https://pub.dev/packages/font_awesome_flutter MIT
form_builder_validators https://pub.dev/packages/form_builder_validators BSD-3-Clause
get https://pub.dev/packages/get MIT
grouped_list https://pub.dev/packages/grouped_list MIT
intl https://pub.dev/packages/intl BSD-3-Clause
lottie https://pub.dev/packages/lottie MIT
overlay_tooltip https://pub.dev/packages/overlay_tooltip BSD-3-Clause
photo_view https://pub.dev/packages/photo_view MIT
pinput https://pub.dev/packages/pinput MIT
shared_preferences https://pub.dev/packages/shared_preferences BSD-3-Clause
shimmer https://pub.dev/packages/shimmer BSD-3-Clause
url_launcher https://pub.dev/packages/url_launcher BSD-3-Clause
zoom_tap_animation https://pub.dev/packages/zoom_tap_animation MIT

Online Suport


If you have any questions about customization of this template wich are not covered in the documentation feel free to ask a question in the comment section or contact me directly via e-mail form on my profile page.

A product by Ilham Meidi Brata


Enjoy and don’t forget to rate my template.

Thank you very much!

Change Log


Version 1.0.0 – 19 Nov, 2025
Bungalion released